Android’s QR Code Scanner Interface Receives Redesign.

QR Code Scanner
Key Takeaway.
  • Android’s QR code scanner now features bottom-anchored controls and a polished launch animation for improved one-handed use.
  • The redesign simplifies post-scan actions with “Copy text” and “Share” options integrated directly into the interface.

Google has quietly rolled out a refined user interface for Android’s built-in QR code scanner through a recent Play Services update. The refreshed design brings controls within thumb reach and streamlined animations, making scanning smoother and more intuitive on modern smartphones.

When users activate the QR scanner via the Quick Settings tile or on-device shortcut, they now see a brief launch animation featuring a rounded square viewfinder. Key buttons like flashlight toggle, feedback, and “Scan from photo” are consolidated into a single pill-shaped control near the bottom of the screen.

QR Code Scanner in Android

This layout contrasts sharply with the old format, where controls were placed at the top of the UI, which often made them hard to reach with one hand.

Once a QR code is detected, the scanner overlays the decoded content in a subtle scalloped circle centered on the viewfinder. The bottom panel now offers not only an “Open” option but also convenient “Copy text” and “Share” actions, eliminating the need to navigate away from the scanning screen.

This design refresh improves usability in real-world scenarios where users often scan QR codes with one hand while multitasking. By repositioning interaction points lower on the screen, the interface reduces strain and increases accessibility.

The new layout also adds functionality by including quick-choice options right after scanning. Whether opening the link, copying content, or sharing the result, users can act faster without leaving the app.

Although Google originally previewed this redesign in its May 2025 release notes for Play Services version 25.19, the visual overhaul is only now becoming widely available as part of the v25.26.35 rollout. Since the update is delivered via Google Play Services, users may need to restart their device or wait a few hours for it to appear even if they are on the latest build.

Google Chrome Rolls Out AI-Powered Store Reviews to Help Shoppers.

AI Generated Review
Credit: Google

Key Takeaway.
  • Google Chrome now offers AI-generated store reviews within the browser’s Site Info menu to help users assess online shopping sites more easily.
  • The feature gathers reviews from platforms like Google Shopping, Trustpilot, and ScamAdvisor, summarizing them into quick, digestible insights.
Google Chrome is adding a new AI-powered feature that makes it easier for users to determine whether an online store is trustworthy. The update, now available in the United States, adds a “Store Reviews” section to the browser’s Site Info panel, giving shoppers quick summaries of retailer reputations based on customer feedback from trusted sources.

This feature is aimed at improving online shopping safety. By clicking the lock icon next to a site’s address bar, users can now view a condensed review summary highlighting key points such as product quality, shipping speed, customer service, and return policies. The reviews are collected and analyzed from Google Shopping and major third-party platforms like Trustpilot and ScamAdvisor.

For example, if a user visits a lesser-known retailer, Chrome will now display aggregated feedback and let shoppers know if others have had a good or poor experience. This helps users make informed purchasing decisions without needing to leave the page or search manually for reviews.

The feature comes at a time when online scams and unreliable e-commerce sites continue to target unsuspecting buyers. Google says this tool is part of its broader effort to make browsing safer and smarter using artificial intelligence. The browser already offers security checks, phishing alerts, and shopping-specific features such as price tracking and coupon detection.

Currently, the AI-based store reviews are only available to Chrome users in the U.S., but there’s potential for a global rollout shortly. Google has not announced support for mobile browsers yet, but the feature is active on the desktop version of Chrome for users running the latest update.

As AI continues to shape the way users interact with digital content, features like this show how Google is leaning into practical, real-time applications that enhance user trust and reduce friction in everyday tasks like shopping.

Google Home Voice Control for Lights Fails, Users Report Flickering.

Google Home Voice
Key Takeaway.
  • Google Home’s voice control for smart lights is malfunctioning. Users report unresponsive commands and flickering bulbs even when the lights are connected properly
  • Google has acknowledged the issue and suggests reconnecting light services in the Home app as a temporary workaround until a fix is released.

Users of Google Home and Assistant are experiencing problems with voice commands for smart lights. Many report that asking Google Assistant to turn lights on or off triggers flickering or fails entirely, causing frustration over disrupted automation routines. These issues have drawn attention from Android Police and user forums across multiple regions.

When users issue voice commands like “Hey Google, turn off the lights,” the Assistant often replies that the device is offline or does nothing at all. Some smart bulbs flicker repeatedly during the "off" state. In many cases, lights only respond when controlled via the Google Home app, suggesting that the problem lies with the Assistant’s voice interface rather than the connected bulbs.

Reports indicate that these glitches affect both "Made for Google" smart bulbs and third-party models connected via the Home app. Users across Reddit and support forums have shared that clearing the cache or rebooting devices generally fails to resolve the issue.

Google has publicly acknowledged the problem and confirmed it is working on a fix. A statement from the official Nest account reassures users that the issue is under investigation and that updates will follow soon.

Meanwhile, a temporary workaround is to reconnect smart light services from the Google Home app rather than resetting or repairing devices. This approach has worked for some users, although results remain inconsistent. Users also report that manually controlling lights through the app continues to work reliably.

Smart lighting is a core function in many homes using Google’s ecosystem. When voice commands fail or cause unintended flickering, it disrupts daily automation routines and undermines user trust. It also adds friction for users relying on Google Assistant for routine tasks. The issue comes at a time when users have voiced broader concerns about reliability in Google’s smart home platform. Google plans to address many of these issues with major updates later this year. 

Google Adds AI Mode Shortcut to Android Search Widget.

Google AI Mode Search
Key Takeaway.
  • Android users can now launch AI Mode from the Search widget with a dedicated shortcut, boosting access to Gemini-powered search.
  • The customizable widget shortcut is rolling out with Google app 16.28 and enhances usability without needing Search Labs enrollment.

Google is now rolling out a convenient shortcut to AI Mode directly on the Android Search widget, giving users one-tap access to its AI-powered search interface. The AI Mode icon appears in its own circle next to the voice and Lens shortcuts, making it quick to launch full-screen Gemini‑powered search responses.

What’s New in Google AI Mode and How to Use It.

Starting with app version 16.28, both beta and stable users can now customize the Google Search widget to include the AI Mode button. Long-pressing the widget brings up a Customize menu where you can enable AI Mode under Shortcuts. It will then appear alongside existing icons for voice search and Lens.

Here is a step-by-step process of how to enable Google AI Mode:

Step 1: Open the Google Search App on your Android phone.

Step 2: Click on your profile in the top-right corner and go to Settings.

Step 3: Select Customise Search widget and then select Shortcuts.

Google Search Settings

Step 4: Inside Shortcuts, you will get an option to add AI Mode to your Google Search.

AI Mode in Google Search

When you tap the AI Mode shortcut, it launches a full-screen interface where you can enter any prompt and receive AI-generated responses. It functions like a conversational search tool, using Gemini’s query fan-out technique to break down your question into subtopics and provide comprehensive information.

Users not enrolled in Search Labs may see the older Locate AI interface, where AI Mode is available in a pill-style button within the Discover feed instead of the widget area. Google encourages users to join Search Labs for a cleaner and more integrated experience.

Also Read: Google Launches AI-Powered Web Guide to Organize Search Results.

How Google AI Mode is Useful for the User.

The widget shortcut makes AI Mode more accessible and intuitive. It removes the need to open the Google app first and streamlines access for users who want next-generation search directly from their home screen.

This update reflects Google’s broader push to integrate AI deeply across its products. While new AI tools like Deep Search and Gemini 2.5 Pro are reserved for subscribers, the widget shortcut brings AI Mode to more casual users in a familiar format.

Google Pixel 9a Review With Specifications.

Google Pixel 9a

Launched on April 10, 2025, the Google Pixel 9a brings flagship‑level features to the mid‑range segment at $499. It’s designed for users seeking stellar cameras, smooth performance, and long-term software support without premium pricing. This review covers design, display, performance, cameras, battery life, software, connectivity, real‑world use, comparisons, pros & cons, and overall verdict.

✅ Pros ❌ Cons
  • Powerful Tensor G4 chip at a budget-friendly price
  • Bright 120Hz OLED display
  • Flagship-level camera quality
  • 7 years of OS & security updates
  • Excellent AI features like Call Screening
  • IP68 water and dust resistance
  • No telephoto or macro lens
  • Slower charging speeds
  • The plastic back feels less premium
  • Higher storage option availability is limited

Google Pixel 9a Specification.

The Google Pixel 9a may be a mid-range phone, but it packs a serious punch when it comes to specifications. At the heart of the device lies the Tensor G4 chipset, the same processor found in Google’s flagship Pixel 9 series. Paired with 8 GB of LPDDR5X RAM and UFS 3.1 storage, this combination delivers a fast and responsive experience for everyday tasks, app switching, and even moderate gaming.

The display is one of the standout features. You get a 6.3-inch Actua pOLED panel with a smooth 120Hz refresh rate and support for HDR10+. But what really grabs attention is the peak brightness of up to 2,700 nits, which makes outdoor visibility excellent, even under direct sunlight. This kind of screen performance is rare at this price point.

On the camera front, the Pixel 9a includes a 48 MP main sensor with optical image stabilization (OIS) and a 13 MP ultrawide lens. It may not be a triple camera setup, but Google’s computational photography ensures excellent results in most conditions. On the front, there's a 13 MP ultrawide selfie camera, which not only fits more people into the frame but also supports 4K video recording.

Battery life is impressive too. The phone houses a 5,100 mAh battery, making it the largest ever in a Pixel. It supports 23W wired charging and 7.5W wireless charging. While not the fastest in the industry, Google includes features like Battery Saver, Extreme Battery Saver, and even an option to limit charging to 80% to preserve long-term health.

Other highlights include IP68 water and dust resistance, stereo speakers, and face + fingerprint unlock. It ships with Android 15, and Google promises 7 years of OS and security updates, which is unheard of in this segment and easily one of the Pixel 9a’s biggest selling points.

Display 6.1-inch OLED, FHD+ (2400x1080), 120Hz refresh rate
Processor Google Tensor G4
RAM 8 GB LPDDR5
Storage 128 GB UFS 3.1 (no SD card slot)
Rear Camera 64MP (main) + 13MP (ultrawide), 4K@60fps video
Front Camera 13MP, 4K@30fps video
Battery 4,600mAh, 18W wired charging
Operating System Android 15 (out of the box)
Build & Design Plastic back, aluminum frame, Gorilla Glass 3 front
Water Resistance IP68 certified
Security Under-display fingerprint scanner, Face Unlock
Connectivity 5G, Wi-Fi 6E, Bluetooth 5.3, NFC, USB-C
Dimensions 152.1 x 72.6 x 8.9 mm
Weight 188 grams
Colors Obsidian Black, Porcelain, Mint
Price (USA) $499 (128 GB variant)

Google Pixel 9a Performance.

After using the Pixel 9a as my daily driver for over two months, I’m genuinely impressed by how smooth and responsive it feels. The Tensor G4 chip, paired with 8GB RAM, handles everyday tasks like browsing, messaging, and switching between apps effortlessly. I never ran into any stutters or lag, even with multiple apps running in the background.

I tried a few games like COD Mobile and Asphalt 9, and the experience was solid at medium settings. The phone did get a little warm during extended play or when downloading large files on 5G, but it never felt too hot or slowed down noticeably.

What really stood out to me were the smart AI features, things like Call Screening, Live Translate, and voice typing actually make a difference in daily use. They run smoothly and add real value.

Overall, the performance feels reliable and fluid, especially for a phone in this price range. It’s not a gaming beast, but for most users, it’s more than enough.

My Experience With Pixel 9a Camera.

From the moment I started shooting with the Pixel 9a, it felt like Google had once again worked its magic in computational photography. The 48 MP main camera with OIS and a wider f/1.7 aperture amazed me, especially in dimly lit places like art installations or evening scenes. I felt like every shot had remarkable detail, punchy yet realistic colors, and solid dynamic range. As Android Faithful wrote, “camera performance is where the 9a shines”, and they backed it up with extensive low-light testing at places such as Meow Wolf and Garden of the Gods.

I tried the new macro focusing mode too, and it produced some stunning close-ups, although focus sometimes centered only in the middle. Even so, I felt it added creative flexibility.

Pricing and Availability of Google Pixel 9a.

The Google Pixel 9a is priced at $499 in the United States, which positions it squarely in the upper mid-range category. For that price, you get the base model with 128 GB of storage, and there's also a 256 GB variant available for a bit more at $599, though Google hasn't officially listed that price across all retailers yet.

You can buy it unlocked directly from the Google Store, or through major carriers like Verizon, AT&T, and T-Mobile, which often with deals or trade-in offers that can bring the price down significantly. It's also available at retailers like Best Buy, Amazon, and Target, both online and in-store.

Considering it packs the Tensor G4 chip, a flagship-grade OLED display, and 7 years of software support, the $499 price point feels very competitive, especially when compared to other mid-range phones from Samsung or Motorola that don’t offer the same level of long-term updates or software features.

Final Verdict

The Google Pixel 9a is a standout mid-range smartphone for 2025, offering a premium display, solid camera performance, a long-lasting battery, and unmatched software update support (7 years). It brings most of the Pixel flagship experience at a significantly lower price. However, buyers should be aware of connectivity concerns, slower charging, and missing advanced AI features present in higher-end Pixel models.

Google Introduces Opal: A Vibe-Coding Tool for Building Web Apps.

Google Opal Vibe-Coding
Key Takeaway.
  • Google’s Opal lets users create and share mini web apps using only text prompts, backed by a visual workflow editor and optional manual tweaks.
  • The platform targets non-technical users and positions Google in the expanding "vibe-coding" space alongside startups and design platforms.

Google has begun testing an experimental app builder called Opal, available through Google Labs in the U.S. This new tool allows users to create functional mini web applications using only natural language prompts and no coding required. Opal aims to simplify app development, making it more accessible to creators, designers, and professionals without engineering backgrounds.

What Is Opal and How Does It Work?

Opal enables users to write a plain-language description of the app they want to build. Google's models then generate a visual workflow composed of inputs, AI prompts, outputs, and logic steps that form the backbone of the application. You can click each step to see or edit the prompt, adjust functionality, or add new steps manually using the built-in toolbar. When you are satisfied, you can publish the app and share it using a Google account link.

This interactive, visual-first approach is designed to overcome limitations of text-only vibe coding by providing clear, editable workflows. Opal supports remixing apps from a gallery of templates or building from scratch, promoting rapid experimentation.

Where Opal Fits in Google’s Vision.

While Google already offers an AI-based coding platform through AI Studio, Opal represents a broader push toward design-first and low-code tools. The visual workflow makes app logic easier to understand and edit, lowering the barrier to app creation for non-technical users. Google’s intention is to expand access to app prototyping beyond developers.

Opal positions Google alongside startups like Replit, Cursor, and design platforms like Canva and Figma. These tools are capturing attention by democratizing software creation using prompts and visual editors, growing demand for intuitive generative coding.

What It Means for Developers and Creators.

Creators and innovators can use Opal to prototype generative workflows, interactive tools, or productivity automations without writing code. Educators could also leverage it to build simple teaching aids or demonstrations. With a public beta released in the U.S., developers in labs can begin exploring and testing apps, providing feedback for future development.

The turn toward a visual workflow also offers more clarity and control, reducing confusion between prompt input and actual behavior. This can help users fine-tune apps step by step, something that traditional prompt-only systems struggle to offer.

How To Share Google Drive Documents With View-Only Access.

Share Google Drive File With View Only Access

Google Drive is a powerful tool for storing and sharing files online, whether you're working on a project, organizing personal documents, or collaborating with others. But not every file needs to be edited by everyone. Sometimes, you just want to share a folder so others can view the contents without being able to change anything. That’s where view-only access comes in handy.

You can restrict any external user from editing your Google Drive document before sharing it for team activities or collaborations. To prevent accidental changes, you can also set the document to view-only mode for everyone, including yourself. 

Let's learn both methods to make our documents and files more secure and safe from any kind of accidental editing.

Share Google Drive Documents With View-Only Access.

To follow this tutorial, all you need is an active Google Account and a document which is already been created and uploaded to Google Drive.

Step 1: Open Google Drive.

To begin, open your preferred web browser and go to https://drive.google.com. If you're not already signed in, you’ll be prompted to log in to your Google account. Once signed in, you'll land on the Google Drive homepage, where all your stored files and folders are displayed.

Step 2: Locate the Document You Want to Share

Scroll through your list of files, or use the search bar at the top to quickly find the document you intend to share. Once you locate it, you can either right-click on the file and select “Share” or open the document first and then click the “Share” button located in the top-right corner of the screen.

Google Drive Document Sreenshot

Step 3: Share with Specific People as Viewers

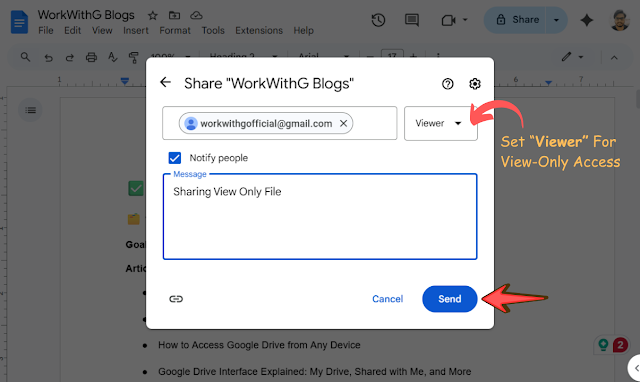
In the sharing dialog box that appears, you will see a field labeled “Add people and groups.” Type the email address of the person or group you want to share the document with. After entering the email, a drop-down menu will appear where you can select their permission level. 

Choose “Viewer” to ensure they can only view the document, but cannot comment on or edit it. Once done, click the “Send” button to share the document with them.

Adding Email id to share Google Docs

Step 4: Share via a View-Only Link (Optional)

If you prefer to share the document via a link rather than individual email addresses, look toward the bottom of the sharing dialog box. Under “General access”, click the dropdown that may say “Restricted” by default. Change it to “Anyone with the link”.

Once you do that, another dropdown will appear beside it—make sure it is set to “Viewer.” Then click “Copy link” to copy the shareable URL and send it via email, chat, or wherever needed.

Sharing Google Drive Doc Link

Pro Tip:
 Before sending or sharing the link, always double-check the access level to make sure the document is not mistakenly being shared with editing or commenting privileges.

Alternative way to Set Everyone's Role To view-only access.

First, open the sharing settings for the document using the same steps described above. For each listed user, including yourself, make sure the access level is set to “Viewer.” Click the dropdown beside each name and manually change the role if needed. Once this is done, no one will be able to modify the document in any way, but they can only view its content.

Changing Document Role to Viewer

Change Editing To View-Only Access in Google Docs.

There might be a possible scenario that you have already provided Editor access to many users for one Google Document, and now you want to change all the access to Viewer (View-Only) access. You can follow the above method to change the access type for each user ID one at a time, or there is a quick alternative way to do so by using Google App Script.

Changing Google Drive Document Permission Using Google App Script.

Step 1: First, go to https://script.google.com and click on "New Project" to create a blank script editor. This is where you'll write the automation code. Inside the script editor, paste the following code:
function restrictEditingToViewOnly() {
  var fileId = 'YOUR_FILE_ID_HERE'; // Replace with your actual fileID
  var file = DriveApp.getFileById(fileId);
  
  var editors = file.getEditors();
  
  for (var i = 0; i < editors.length; i++) {
    var userEmail = editors[i].getEmail();
    file.removeEditor(userEmail);
    file.addViewer(userEmail);
    Logger.log("Changed " + userEmail + " to viewer.");
  }
  
  var myEmail = Session.getActiveUser().getEmail();
  if (myEmail !== file.getOwner().getEmail()) {
    file.removeEditor(myEmail);
    file.addViewer(myEmail);
    Logger.log("You (" + myEmail + ") are now a viewer.");
  } else {
    Logger.log("You are the owner transferring ownership manually if needed.");
  }
}

Step 2: Replace 'YOUR_FILE_ID_HERE' with the actual file ID from your Google Drive document URL. This ID is the long string found in the URL of the file, typically located between /d/ and /edit.
https://docs.google.com/document/d/1XiYBcFw4VTHOmaD1pMmMTNlt2btERcxe0us3pHR4D4tNs/edit?usp=sharing

Step 3: Give your Project a good name and click the Save icon to save your project with the Script.

Step 4: Now, click the Run button (the triangular ▶️ icon) to execute the function. The first time you run the script, Google will prompt you to review and authorize the required permissions. Click on Review Permissions.
Google Script App

Step 5: If you are running Google App Script for the first time, you will get a pop-up saying "Google hasn't verified this app." You need to click on "Advanced" to open the advanced settings, click on your Project name, and provide all the required permissions to run the app.
Advance Setting for Google App Script

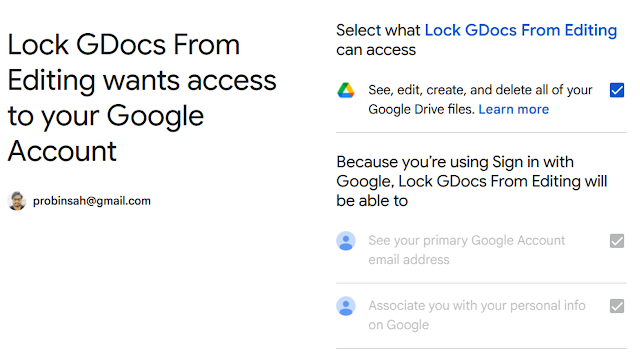
Step 6: You need to give your script permission to access your Google Account and select the checkbox shown below so the script can make the required changes in your Google Drive Document settings. Click on Continue to save to proceed.
Google Drive Permission
Step 9: After the script runs, all existing editors will be converted to viewers, and your own access will be downgraded unless you are the owner.

Note: Google doesn't allow you to remove your own access if you're the owner. You must transfer ownership manually through the Drive UI.

Be cautious with this script, especially if you choose to remove your own editing access. If you're the file owner, Google will not allow you to remove your own access via script, and you must have to transfer ownership manually through the Drive interface. For safety, it is always recommended to test this script on a duplicate file first to avoid losing access to important content.

DON'T MISS

AI
© all rights reserved
made with by WorkWithG